- Initial drawings on iPad with Apple Pencil and Autodesk SketchBook
- iPad connected to Mac as graphics tablet with Duet
- Fusion 360's Spline curves
- Fusion 360's Shell command
- Fusion 360's Loft command options
- Fusion 360's Sculpt mode
- Printing big
Concept & Design
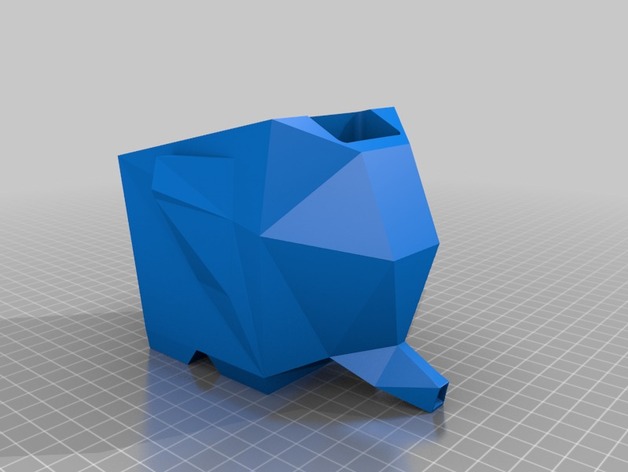 I was looking for a bigger project to print. Most of my projects have been just a few inches in size. But printing large solid objects can take a long time, and as a hobbyist there are limits on the time I can spend babysitting large prints. So I was thinking about large hollow products when I encountered this elephant-shaped cutlery drainer on Thingiverse. It's a useful product, if a bit silly. Water from the draining items shoots from the elephant's trunk into your sink. But I didn't really like the angular appearance of the "low-polygon" method.
I spent a few hours among Asian elephants on a safari in Sri Lanka this year, and elephants have been on my mind. So I decided to try a more realistic, but still stylized, version of the elephant drainer.
Design considerations included:
- A large top opening to handle a realistic number of cutlery items
- Possibly a divided interior so items would not lay over too much
- Low center of gravity and/or wide stance so top-heavy objects would not tip it over
- On a real elephant, the trunk starts high on the face and goes downward. In this drainer, the water is going to come from the bottom tips of the objects. The water can't flow up to enter the trunk, so the body and face design needs to give the illusion of a trunk while letting the water enter the bottom of the trunk.
I did not know how I would possibly sculpt the thing from scratch, and most objects I've designed have been basically geometrical, so I envisioned virtually "carving" the body and head from a solid core by cutting it from the side, top, and front using profiles.
Concept art
I've been playing with Autodesk's SketchBook and Apple Pencil, so I used it to draw multiple profiles. For the top and front profiles I used its mirror function to get a symmetrical profile. I knew that in Fusion 360 I would probably design one side and then mirror the solid object, so I didn't really *need* full drawings, but drawing both sides of the profiles helped make sure it was going to be attractive and what I envisioned.
 |
| Side view |
 |
| Top view. Note that the legs stick out a bit from the body. |
 |
| Head front view |
 |
| Rear view |
Version 1 - Carved from Three Profiles

I imported the drawings into Fusion 360 and used Spline curves to reproduce them as sketches to use to cut virtual blocks in three directions to form the body, head and trunk. I tried the "duet" application to draw on my iPad as a connected tablet, but ultimately it was easier to use the mouse on the big screen.

I learned to use the Shell feature to hollow out the combined shapes. I added a 5-degree sloped floor and ensured a hole was drilled through the trunk.

I used the Loft feature to join elliptical shapes to form the front and back legs.

I created the whole thing small, so I could print samples relatively quickly. (This elephant is apparently not afraid of mice.)
Ultimately I did not like the result. It was too angular - you can see how the body has places where two different curves join. And there's an artificial-looking "web" under the trunk.
The other problem was that the Shell command has trouble with shapes that have too many complex curves joining. It ultimately failed with my model. So I started over.
 I spent some time learning about Fusion 360's Sculpt mode, which works by modifying 3D forms, rather than extruding them from sketches and cutting things. I started with two spheres and pushed and pulled them into more organic shapes for the body and head.
I combined them with mathematical shapes for the legs and trunk.

I also lowered the body closer to the ground to reduce the amount of support material that would be needed.

I didn't like this result either. The short legs and trunk made it look more like a pig than an elephant. So back to the drawing board.
Version 3 - Combined Sculpted Shapes
 I thought about making realistic legs to convey the elephant-ness, but bent so the belly would still be on the ground. I found a variety of artwork and sculpture depicting elephants kneeling, and then produced this sketch based on them.
Back in the Sculpt mode, I learned to stretch and bend cylinders: with a single bend for the back leg, and with two bends in the front leg so the foot would be flat on the ground. The legs intentionally crowd the face.

Another cylinder was the basis for the trunk. It's wider at the top and stands out a bit from the face.
 I pushed some little dents into the top of the trunk to make it wrinkly-flexible looking. (I got this idea from how they put finger grips in a knife handle in an Fusion 360 instructional video.) You can see that in this shot of the full-size final product being printed.
Here you can also see the support material around the belly, under the legs, and under part of the trunk.

For the eye I went back to how a real elephant looks. I had taken this extraordinary shot of a wild elephant in Sri Lanka.

I traced over the eye in Fusion 360 and turned it into a reverse extrude, essentially a cutout. The shell is thin enough, and the cut deep enough, that it's actually open in places and lets light shine through.

Here's the finished small-size half-body test print. Printing a half-body sample is a great way to see how it's really going to work internally, how things are going to fill in, etc. You can see how I filled in the bottom of the body and trunk with a 5-degree slope for water to flow out.
The Final Print

I chose PET-G filament because it's food-safe, and found a really nice silver-gray.
 Unfortunately I forgot one thing: my print bed doesn't heat evenly, plus I think I didn't put enough hairspray at the the very back. So the left rear foot failed to adhere perfectly and curled up. I didn't see it until it was all done, or I might have started over. (Support material is still attached in this shot.) With a little grinding of the irregular parts, it came out OK, it's just kind of lifted in the air.
I also forgot to add a tail!

 I had thought ahead and added slots on the sides to allow for a removable divider, printed separately. This allows objects to stand up straighter.
 The divider doesn't go all the way to the bottom, so it doesn't obstruct the drainage.
All in all, I'm quite pleased with how it came out, being my first sculpted project and my first really big print. This is about as big as my Robo3D R1+ can go. Lots of people saw it at our house at Thanksgiving and a couple people asked for copies for Christmas... but at 18 hours per part that may not happen. It's definitely an iterative process. Fortunately printing small-size models saves time and plastic.
I published the design files on Thingiverse here. In the first two weeks over 400 people have downloaded it, but no one has posted a print yet.