Sunday, September 22, 2019

QuilterCam

My wife is a quilter. She has a Long-Arm Quilting Machine for stitching together the top, batting, and back of quilts up to 10 feet wide.

It can be run manually, but it also has a computer drive mechanism so it can do preprogrammed patterns, doing a strip about 1 foot wide at a time. It's possible for the thread tension to be incorrect or go out of whack, causing the stitches to be uneven or "looped", mainly on the bottom side where it can't be seen easily. In that case one needs to stop it promptly and rip out the ugly stuff.

Since I had previously set up a Wyze camera to monitor my 3D printer from afar, we came up with the idea of having a camera show the bottom view of the quilter, to keep an eye on the stitching quality. But since the quilts can be up to 10 feet wide, a single camera won't show the whole area. So I'm working on a bracket to mount the camera to the bottom of the mechanism, so it will follow along and show the area just stitched.

The bracket needs to fasten onto the mechanism tightly because it's going to be moving around quickly. But it needs to be removable too. Fortunately there are a couple of holes conveniently placed on the bobbin arm.


I designed this angled plug on the end of some slightly flexible arms, to make what I call a "clip" that snaps onto the bobbin arm.

It took quite a few iterations to get the clip dimensions and stiffness correct. Fortunately I was able to print "slices" instead of printing the whole part.


Here's how it looks installed.

The bracket needs to be stiff in the X and Y dimensions, because the quilter head will be moving around quickly. But it does not move up and down, so stiffness in the Z dimension is not so important. In an earlier iteration I had the bracket extend beyond the clip to have some leverage to keep it from wobbling up and down, but that proved not to be necessary.


It's a large object with parts that go up and down from the central bracket plane, which would be hard to 3D print in one piece and would take a lot of support material. So I print it in two parts and plan to glue them together. At the moment they are held together with double-sided tape.

This went through about 3 or 4 iterations before I figured out a simplified design which needs almost no support material. Each part can be iterated separately.


There are some constraints on the location of the camera. It needs to clear the carriage mechanism in the Y dimension at one extreme, so the bracket can't be too short...


... and needs to clear a roller in the Y and Z dimensions at the other. Since it's so long, it has to slope down.


It needs to place the camera down a bit below the fabric so the camera can focus on it, and a bit to the left to look at the just-stitched area.


The Wyze camera comes with a tilt-swivel mechanism, so I just need to get the camera close to the correct location and angle, and then I can fine-tune it. I think I'll have to fix the tilt-swivel mechanism in place with some removable glue... it's not very stiff.


The camera needs power, and conveniently there is a USB port at the back of the carriage. The power cord is masking-taped in place for now, and when this is all finalized I'll fasten them in place with sticky cable clips.


Next step is to try it in action and see if there are any problems with vibration etc.


Tuesday, September 17, 2019

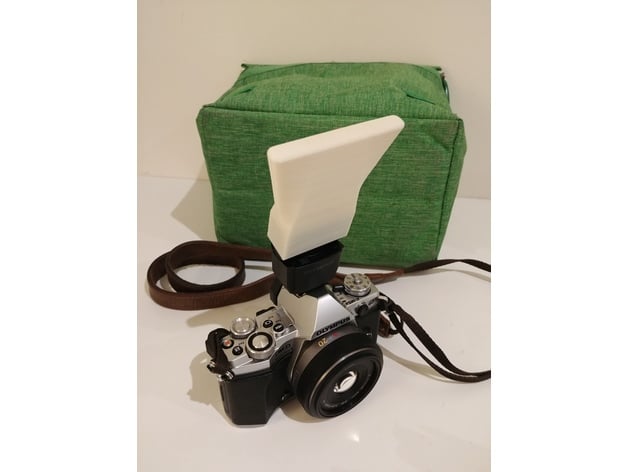
Diffuser for Olympus FL-LM3 flash


I love Thingiverse! It's a repository for the obscure, but it often has exactly what one needs. I recently got an Olympus camera which came with a tiny external flash. I looked on Thingiverse, and sure enough, someone named Dale Armit in Australia had designed a snap-on diffuser for it.

I downloaded it right away and recently got around to printing it in Inland PLA (white, of course).


The first try did not come out so well. The first few layers had a lot of gaps and failures to adhere. And the rest of it had little gaps as well. It's pretty common to have issues the first time around, and fortunately little things like this don't use much time or plastic: it only used $0.33 of filament. So I changed several settings:

  • Reduced the speed
  • Increased the temperature
  • Measured the actual filament diameter with calipers. It was about 3.5% smaller than the previous filament I used. That doesn't sound like much, but it causes the software to underestimate the amount of plastic to extrude.
  • Checked the fan speed settings.
  • Closed the air conditioning vent in my office, so a blast of cold air would not interfere with adherence.
When you're dealing with fractions of millimeters, these little variations can make all the difference!

I was able to test the fit with this part, and it seems to be just fine. The next iteration is looking good.


LGBTQ+ pronoun add-ons to church name tags

A few months ago we held a workshop on LGBTQ+ topics at our church and one topic was how to let people know what to call you - what pronouns you use.  Some people have started to use little buttons or stickers that say she/her/hers, or whatever they prefer. An important aspect is that not only LGBTQ+ people can wear them, but "allies" can wear them too. That helps prevent anyone from feeling singled out, and communicates that you are LGBTQ+ friendly!

At the end of that workshop my wife and I came up with the idea of making standard pronoun name-tags available for people to use at church, that would look like and blend in with our regular nametags, to normalize the idea.  We developed the idea of a magnetic pronoun tag that would attach to our regular nametags. We are not the first or only church with this idea. A small but growing number of churches and temples around the country are starting to do something like this. 


It had to be just the right thickness to bring the pronoun part "up" to match the level of the name tag part. And the dimensions would need to specifically match the name tags that we buy. We learned that regular badge-makers could not produce such a product. They work with flat sheets of plastic and we needed a 3-dimensional part. So 3D printing was the natural solution.


They would be optional (not everyone will want one), and removable (because people may not be comfortable wearing them all the time) and changeable (because people's gender identity and/or choice of pronoun can change over time, or even day to day). We 3D printed some samples and wore them for a couple of months, in various places to get people’s reactions and spread the idea. 


The great thing about 3D printing is the ability to quickly try out designs. I tried just a plastic back that would go between the name tag (which has a magnetic plate) and the "backer" that has three magnets, so it would be clamped between. That was not secure enough, so I decided the add-on needed magnets too, so it became a sandwich. 


The lettering on the prototypes did not come out very well. I wanted to use a very small nozzle to get finer details, but I knew that would make the rest of the part take a long time to print. I used a filament-switching technique I've learned, to print the main part in black and the front part in white, with the letters "cut out" to let the black show through. It was good enough for a prototype.


Once we had worked out the details, we contacted our badge maker and arranged to have the pronoun parts professionally made in the right size to work with the add-on.

Next I worked on mass-producing them. I worked out a layout that would let me put 15 to 20 at a time on the print bed.

Unfortunately the heating of the bed is not uniform, and the parts in the back and corners would not stick, and would curl up. I eventually settled on an arrangement of 15 at a time. (This being PLA, we were able to rescue some of the curled ones by pressing them with an iron.)


We bought magnets on line and glued them to the back with superglue because the bond needed to be strong. Kind of tricky, and messy at times. I used the regular "backers" on the other side of the parts to align the magnets and keep them in place while drying. Then we glued the pronoun plates to the front with Goop because that does not need to be strong, and if it ever becomes necessary to pull them off for some reason, Goop is relatively peelable.

We produced 130 of these and have made them available at church. They're a big hit!

Bracelets for hair rubber bands

I printed a couple of these bracelets for my daughter. They have a groove in the middle designed to hold a hair rubber band, which is really helpful when you have little daughters!

The design is from Lance Jenkins on Thingiverse. I printed one in Proto-Pasta Mermaid's Tale, an opaque teal (her favorite color) with mica flakes. The other is in a pink PET-G which is translucent and catches the light in a sparkly effect.

Both printed fine the first time. I keep a spreadsheet listing nearly all of my print jobs, with details of most of the settings I used. That way I can look back at other prints with a particular filament and see what worked.