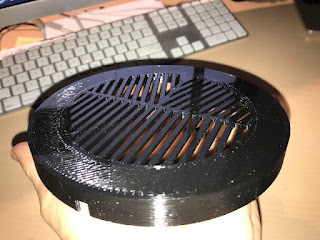
One of the hard parts of astrophotography is ensuring the scope is focused as well as possible before taking multiple images. One might think, "just set the lens to the infinity mark", but for a couple of reasons that doesn't work. In 2005 a Russian astronomer invented the Bahtinov mask, and later Chris Lord adapted it into the Lord mask (or "Y" mask). A focusing mask splits light from a bright star into a diffraction pattern. It can be easier to see changes in the pattern as you focus the instrument than it is to see changes in the focus of an actual star image. Here's a great article showing how they work. The consensus on line seems to be that Bahtinov masks work better, but Lord masks are easier to fabricate (by hand or by printing). They are available commercially. A few people have written about 3D printing either kind of mask, but not many. There are a couple of designs on Thingiverse. But the size of the openings in the mask are related to the focal length of the telescope or lens, the size of the total pattern is related to the aperture, and the overall size of the mask is related to the physical dimensions and how you plan to attach it, so the mask designs tend to be specific to a particular lens or scope.
So naturally I planned to design and print my own. Fortunately there is a web site which can generate 2-D Bahtinov mask layouts (as SVG files) for any combination of focal length and aperture. I could generate them for my devices, and design rings to attach them to the front of my lenses and scope. Since the Y mask is far simpler, I worked on that first. The width of the legs of the Y is supposed to be the same as the width of the slots and bars in the B mask. For my telescope, that works out to 3mm wide, which is no big deal to print. I did the designs using parametric modeling so I could tweak the bar width as well as the rim size for a good fit on the lenses.

Here's how the finished Y mask looks. I tried it on my telescope one night, and I kinda-sorta-maybe could see the "spike" pattern that you use for focusing. The images I took of Jupiter were reasonably sharp. But I could not really say this worked.
For my camera lenses, the calculated Y leg widths are problematic:
- 40mm to 150mm zoom lens: 0.1mm to 0.5mm wide
- 25mm prime lens: 0.1mm wide
- 14mm to 42mm zoom lens: 0mm to 0.1mm wide
 My smallest 3D printed nozzle is 0.15mm. With careful software settings I can extrude a fraction of that, but it's difficult. A film of plastic that small is very fragile, and any irregularity in the print leaves gaps. There's an option to change one of the calculation parameters by a factor of 3, but that still means that for my smaller lenses the dimension would be 0.1mm to 0.2mm.
With some trial and error I was able to produce some Y masks for my 25mm and 40-150mm lenses. When I tried them I could not see any spikes at all.
So I went to Plan B (pun intended). I generated a Bahtinov mask for my 40-150mm zoom lens. Since the pattern is tied to the focal length, one mask cannot be correct for the whole range. I chose 0.15mm which should work for the middle range, about 50mm to 100mm. Since the B mask is a negative design, slots instead of thin legs, it's much more robust and easier to get a good print even with tiny slits.
Here's how it looks.


If the angles between the legs are equal, then the lens is in perfect focus. If it's off, then the central spike will be offset to the left or right, which is really easy to see as the angles become unequal.
Here's a test photo of Jupiter and its moons. This is not a great picture - at ISO 8000 there's a lot of noise - but the point is that when zoomed up to full screen, Jupiter shows up clearly round, its moons are visible as small points, and stars behind them are sharp small points. So the focus is perfect. This is 105mm, 1 second exposure.

Next I generated a much larger Bahtinov mask for my telescope. The focusing image is rather faint, but usable.
Here are images of Jupiter and Saturn from my first night of testing with the B mask on my telescope. These are composites of 9 images, stacked with SiriL and sharpened in Photoshop. (Click to zoom in on these.) The source images are sharper than I have been able to achieve before, but still limited by the atmosphere and the telescope optics.


